

Sometimes a custom build starts with something simple, like helping a brother out. That is exactly how this 2024 Low Rider ST project really got rolling. A club brother rolled into town for rally with a damaged front wheel on his 2023 ST, and the crew at Deadwood Cycles decided to pull the custom wheels off their own nearly new Low Rider ST to keep him riding.
That one favor turned into the perfect excuse to walk through a full custom wheel swap, share some hard-earned tips, and lay the groundwork for a full performance build on Harley’s 117-powered Low Rider ST platform.
You can watch the full tech video on Youtube or grab issue 317 of Cycle Source.

Why This Low Rider ST Is Getting Custom Wheels Now
The bike in question is a 2024 Low Rider ST with just over 500 miles on it. The funny part is, the owner has only put about 50 of those miles on the bike. Everyone else keeps snagging the keys.
Tech tips in this episode are brought to you by SNS, a name anyone in powersports knows for proven performance parts. The focus here is not a dyno sheet or a big motor, at least not yet. It starts with style and safety.
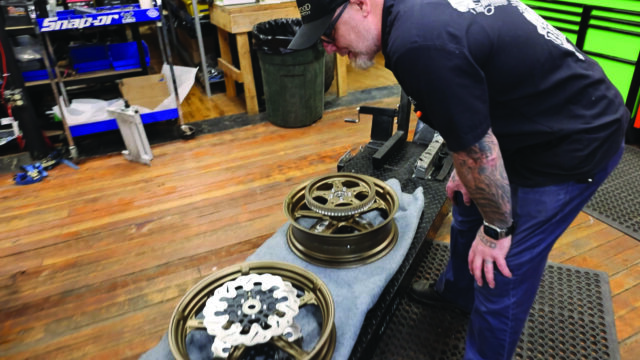
The new wheels are custom SMT wheels sourced through Paul Yaffe’s Bagger Nation. They arrive with:
- Rotors already installed
- ABS bearing already in place
Riders who want to see the kind of big bagger wheels SMT offers for Harley, Indian, and Victory can check out the SMT big bagger wheel lineup. For those interested in Yaffe’s styling side of things, the Bagger Nation collection can be seen in the Paul Yaffe Bagger Nation catalog.
The idea is simple: swap on the SMT wheels, help the visiting rider get rolling again, and keep building the ST in stages into a serious custom and performance bike.
The First Problem: Hanging Brake Calipers
The first thing that jumps out in the swap is something every tech should hate: a brake caliper hanging by the brake line. That sight drives the Deadwood crew crazy.
Instead of letting the caliper dangle, they:
- Use a bungee cord to support the caliper
- Tie it up to take all stress off the brake line
It is a tiny step that saves hoses, fittings, and headaches. Around this shop, if somebody needs a tool or a strap, they yell “Vern” (or “Burn” in the subtitles) and it seems to appear from thin air. Every shop has that one person.
Safe Front Wheel Removal On A Low Rider ST
Pulling a front wheel off a modern Harley is not hard, but it is easy to do it wrong. The crew shows how to do it without drama or damage.
Step 1: Support The Bike Correctly
The bike goes on a lift, then they raise it just enough to take the weight off the front wheel.
Key points:
- Lift the bike until the wheel just starts to move freely
- Do not let it hang with the suspension topped out hard
- Keep things stable so the forks are not flexed or twisted
The idea is to let the wheel come out smoothly without the weight of the bike fighting the axle.
Step 2: Secure The Brake Caliper
With the front end off the ground:
- Remove the caliper
- Support it with a bungee cord so the line is not taking the weight
Letting a caliper dangle might feel quick, but it is a fast way to damage a brake line.
Step 3: Deal With ABS Sensor And Spacer
Modern Harleys run ABS, so there are more parts hanging off the front wheel than in the old days.
They point out:
- The ABS sensor sits near the rotor
- There is a wheel spacer that needs to be kept in order
The ABS sensor should come out before things get tight. It is easy to forget that step, then fight it around the fender or bend something.
Step 4: Slide The Wheel Out Cleanly
With:
- The front end supported
- Caliper hanging safely on a bungee
- ABS sensor pulled
- Axle removed
The wheel comes out clean. No hammering, no swearing, and no scratched forks.
That “no drama” style is the goal every time.
Installing The New SMT Wheels Like A Pro
Once the stock wheel is out, it is time to talk about bearings, direction, and setup on the new SMT wheel.
Primary Side Bearing Rules
The crew spends a minute on wheel bearings, because this is where a lot of people get it wrong.
Harley moved from older open bearings to sealed bearings years back. With the early sealed bearings on 3/4 inch and 1 inch axles, a tech could almost ignore orientation, press them in, and forget about them. They lasted a long time and only got changed if a wheel was getting chromed or powder coated.
Things changed when 25 mm bearings showed up, likely tied to ABS systems. Since then, more wheel bearing failures have shown up, and installation order really matters.
They spell out the rule:
- Always install the primary side bearing first
As the rider sits on the bike:
- On the front wheel, the primary side is the left
- On the rear wheel, the primary side is the right
Even on non-ABS models, that order stays the same.
A simple install order looks like this:
- Press in the primary side bearing
- Drop in the center sleeve
- Press in the other side bearing
ABS bearings are not the same thickness as non-ABS bearings. That is why ABS wheels use different wheel spacers and why guessing at parts or orientation can wreck clearances fast.
Directional Tire Mounting And Orientation
The SMT wheels are fitted with Michelin Commander 3 tires. These are directional, like most modern rubber.
A few habits stand out:
- On the front, the ABS side is on the left
- The installer always sets things so the wheel would roll counterclockwise if laid flat, at least for a normal left side drive setup
For a rear wheel with a left-side drive:
- The pulley side would be facing down when the wheel is on the tire machine
- Rotation is set so the tread pattern is correct when the bike rolls forward
Valve stem placement matters too. The stem is set on one side of the duct or drop center of the wheel so that tire irons or machine arms stay clear, especially on bikes that use Bluetooth tire pressure monitoring sensors.
Heat is used on the tire bead to help it slip over, then the bead is worked carefully until it pops on cleanly. The goal is a smooth install, no pinched beads, and a tire that seats evenly, often checked with a gauge that reads “triple zeros.”
Why Wheel Torque Matters So Much
Once the tire is mounted and the wheel is ready for the bike, things move to the axle, pinch bolts, and brake hardware. This is where torque specs matter more than most riders realize.
How Bearings Actually Ride
Wheels spin on bearings that have:
- An inner race that is captured by the axle
- An outer race that is fixed in the wheel hub
The wheel itself rides on the bearing balls or rollers between those two races.
When someone cranks the axle nut down, it is not just about “making sure the wheel does not fall off.” The real purpose is to set the preload on the wheel bearings.
If the spec calls for 70 to 75 ft-lbs and somebody hammers it to 100 ft-lbs:
- Threads on the axle or nut can stretch or get damaged
- The preload on the bearings goes out of range
- Bearing life goes down fast
The crew reaches for the factory service manual to confirm:
- Axle torque
- Pinch bolt torque
- Brake caliper bolt torque
They mention front caliper bolts in the 28 to 38 ft-lbs range, but still confirm it rather than guess. That habit is what keeps bikes safe and repeatable.
Grease, Loctite, And Thread Practices
There is a quick side talk in the shop about whether Harley wants grease or anti-seize on axles these days.
Grease On Axles
Older setups with Timken style bearings saw grease used on certain parts from the start. With sealed bearings, things shifted a bit over the years.
The conversation notes:
- Early sealed bearings sometimes used silver-colored anti-seize that could get pasty with moisture and cause sticking
- More recent habits lean back toward wheel bearing grease on axles, something Indian has used for a long time
The point for the reader is simple: follow the latest factory recommendation for that model, and do not guess based on old habits.
Red Loctite Vs Blue Loctite
Rally season always shows one thing: riders who coat entire bikes in red Loctite because they never want anything to come loose. That sounds smart at first, but it creates a mess.
The shop breaks it down clearly.
Red Loctite
- For parts that are not meant to come off often
- Used on things like internal engine fasteners or big shock bolts
- Needs heat to remove
- A couple drops on large diameter axle threads can be helpful
Blue Loctite
- For parts that see regular service
- Used on things like fender bolts and other small hardware
- Designed to come off with hand tools
- Good choice for small bolts up to about 1/2 inch
They also show proper use:
- Apply a small amount to the bottom few threads
- Thread bolts in by hand to feel for any cross-threading
- Then tighten with a ratchet and final torque with a torque wrench
Overuse of red, especially on small service parts like caliper bolts or fender bolts, is called out as a bad habit.
Quick Reference Table: Gaskets And Loctite
Here is a simple snapshot of a couple topics covered.
| Item Type | Use Case | Key Detail |
|---|---|---|
| Red Loctite | Internal engine, shock bolts, big axles | Needs heat to remove, use a few drops |
| Blue Loctite | Fenders, smaller service bolts | Hand tool removable, light coverage |
| Tapered gasket | Pipes with a visible taper at the outlet | Common graphite-style gasket |
| Flat gasket | Pipes with flat sealing surface | Used when pipe end is not tapered |
Final Front End Checks
After the front wheel is back in place with the new SMT setup:
- Pinch bolts are torqued
- Axle is torqued to spec
- Brake calipers are reinstalled with proper Loctite
Then they:
- Spin the front wheel to feel for any drag or roughness
- Check tire pressure again
- Pump the front brake lever until it feels firm
- Lower the bike so the suspension settles and the wheel seats naturally in the forks
Once that all feels right, it is time to move on to the rear and then to the exhaust.
Basani Exhaust Swap And Exhaust Gasket Basics
Part of this build phase is fitting a Basani pipe in place of the stock mufflers. The bike had already been run on the dyno in completely stock trim, so there is a baseline for horsepower and torque out of the factory 117.
Start With The O2 Sensor
On newer Harleys, exhaust pulls are not just about clamps and flanges.
Before anything else, they:
- Unplug the narrow band O2 sensor on the rear pipe
Anyone who has worked on pre-2006 bikes sometimes forgets this step, since those older models did not use O2 sensors.
Always Replace Exhaust Gaskets
Whenever an exhaust comes off, the exhaust gaskets get changed.
Most aftermarket Harley pipes use a common tapered graphite exhaust gasket that dates back to the EVO days.
The crew explains how to match gasket to pipe:
- If the pipe has a taper where it meets the head, use a tapered gasket
- If the pipe end is flat across, use a flat gasket
Trying to use the wrong one can cause big issues. A flat gasket with a tapered pipe will not seat all the way. That makes it hard to start the nuts on the studs and can lead to leaks.
Matching the gasket to the pipe shape is one of those small details that separates a clean install from a noisy one.
What Comes Next For This 2024 Low Rider ST Build
The wheel swap and Basani exhaust are just the start. The shop has a clear plan to turn this Low Rider ST into a sharp custom with real performance.
Here is the rough roadmap they lay out:
- Next comfort pieces: La Pera seat and a new windshield
- Passenger setup: Rear passenger pegs to make two-up rides possible
- Exhaust and tune: Basani exhaust installed, then a Power Vision tune loaded
- Dyno time: Another dyno run after the tune to compare to the stock baseline
- Air cleaner: A BA air cleaner from Fueling to let the 117 breathe better
- Motor work (winter plan):
- Full Fueling goodies inside the engine
- Vance & Hines Motorsports headwork
- Big bore kit from Revolution Performance
Suspension and style are on the list too:
- Legend suspension front and rear
- Bagger Nation bodywork to tie everything together visually
Riders who want to follow more of these projects and tech segments can subscribe to the Cycle Source YouTube channel or the dedicated Cycle Source TV channel. Long-form content and features also live on the Cycle Source TV site and the main Cycle Source magazine website.
Wrapping It Up
This simple act of helping a brother out turned into a clear walk-through of how to swap custom SMT wheels onto a 2024 Low Rider ST the right way. From supporting calipers with a bungee, to installing the primary bearing first, to using the correct exhaust gaskets, the focus stays on the small details that keep a high-performance Harley safe and tight.
As the build continues with tuning, suspension, motor work, and Bagger Nation parts, this ST will move from “nice stock bike” to a full-on custom. Riders who care about doing their own work can pull a lot from this process: respect the torque specs, pick the right parts, and take time to set things up clean. That mindset keeps custom bikes riding hard for a long time.